


ELINCHROM OCTA: Deep vs Normal
There are tons of lighting modifiers to choose from, but I almost always bring an Elinchrom modifier with me on a shoot. I have tried more than a few dozen lighting modifiers, and discovered that Elinchrom produces a particular quality of light that fits my style of photography, and is used by many professional photographers. Among the most versatile lighting modifiers are the Elinchrom 39” Octas because they produce very soft light, are easy to carry around, and can be used for tight portraits or full-body shots. So I wanted to do a side-by-side test of the Elinchrom Normal Octa vs Elinchrom Deep Octa, and see how they compared.
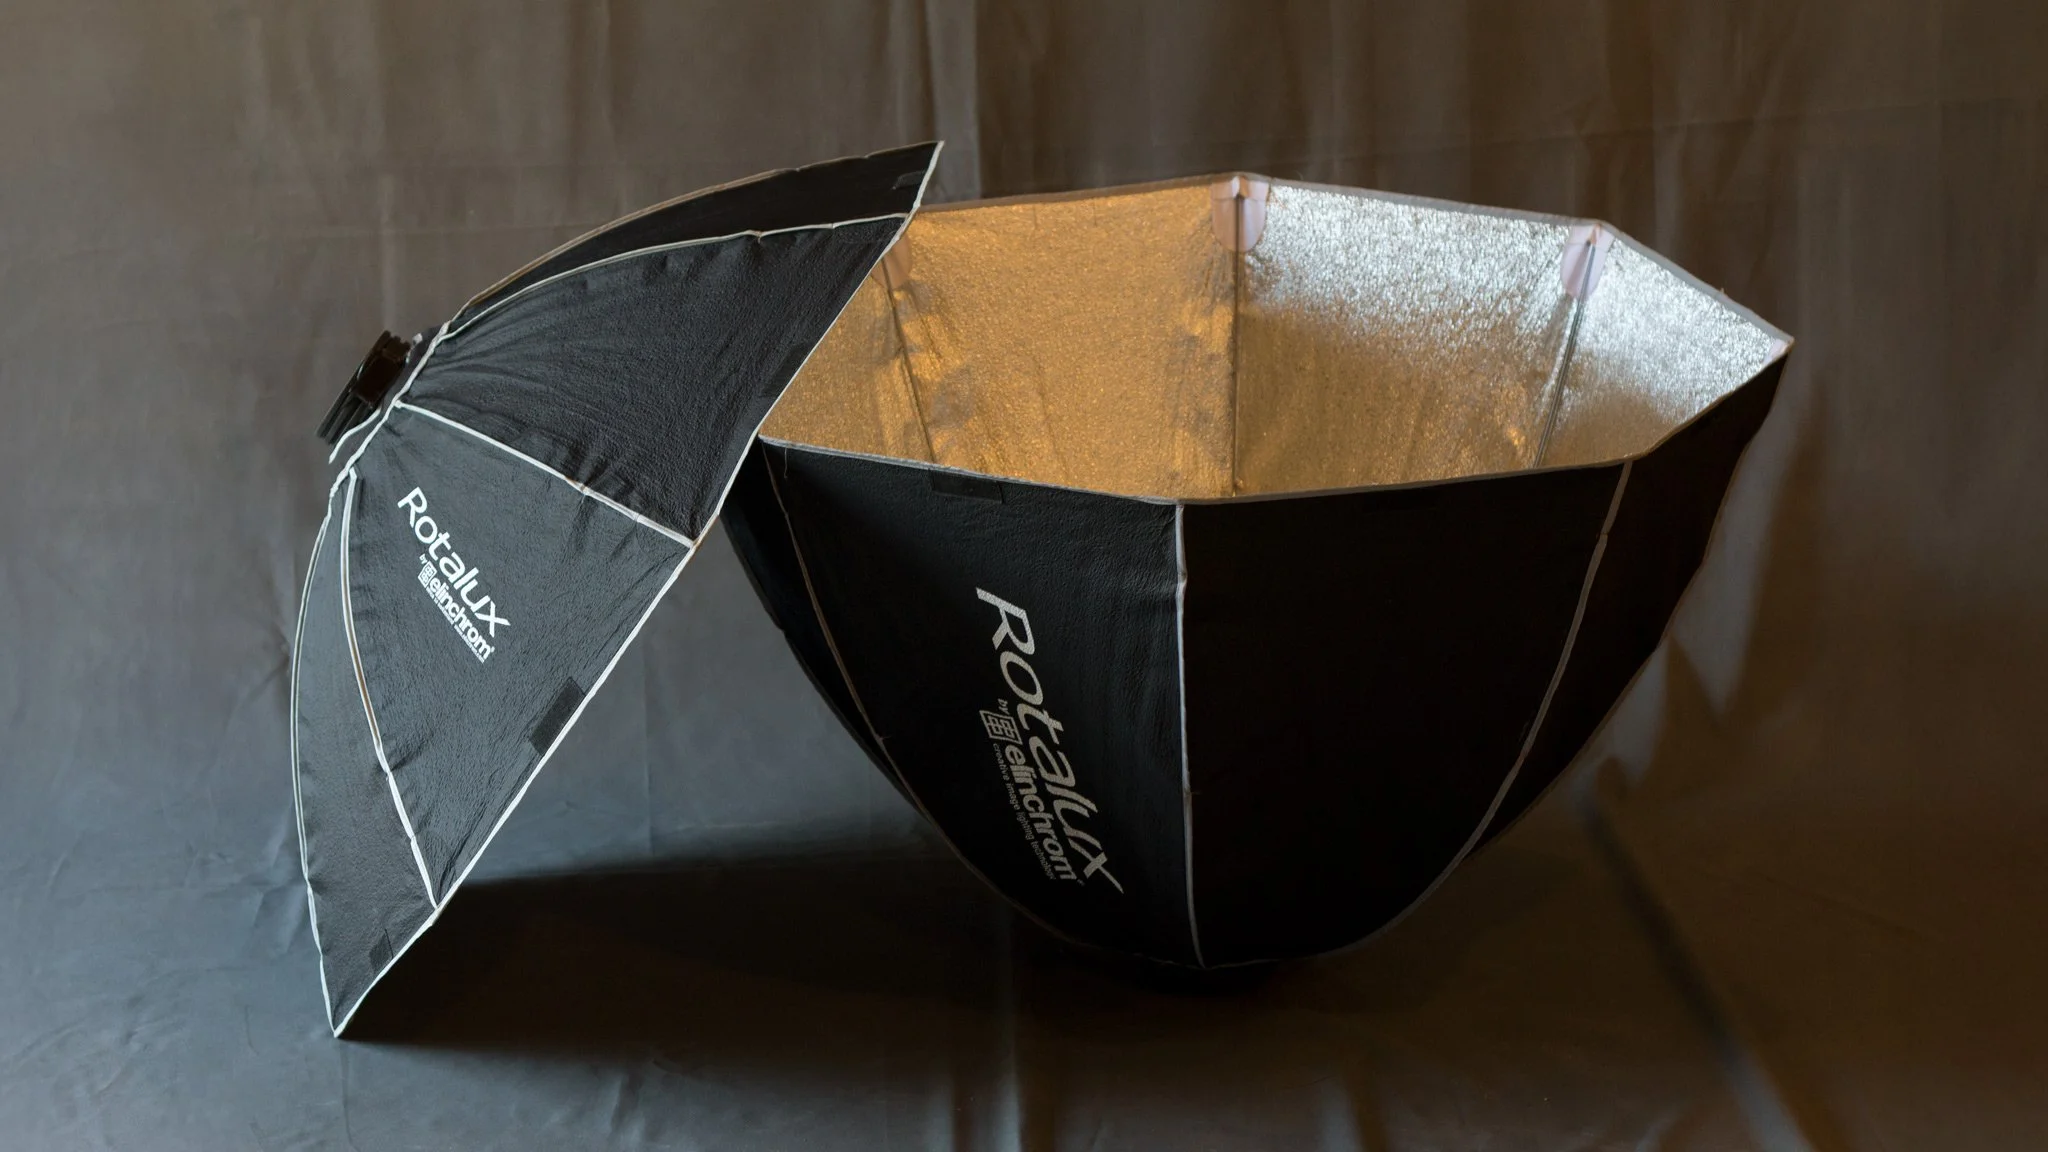
Assembly and Accessories
My worst Elinchrom experience is assembling each octabox. It is easier with two people, but I’ve cursed up a storm while doing it myself. However, the effort is worth it.
If you don’t have an Elinchrom flash head, you will have to buy a separate speed ring. For example, I use each of these octas with a Profoto head, so I had to buy an Elinchrom Speedring Adapter for Profoto Flash. I recommend you assemble, open, and close the octa with the speedring on the ground, facing up. It is very quick to open and close this way. Both octas are also light weight, making them ideal for on-location shooting.
The Elinchrom Octa comes with two levels of diffusion, one on the outside and one that you can snap on the inside. I only use the outer diffusion because I have found I get very comparable results with or without the extra inner diffusion. The outer diffusion Velcros on, making it fast and easy to assemble.
Complete Elinchrom Octabox Price List:
● Elinchrom 39” Deep Octa: comes with 29.5” carrying bag
● Elinchrom 39” Normal Octa: comes with 22.5” carrying bag
● Elinchrom Speedring Adapter for Profoto Flash: This speedring is for Profoto strobes. Here is a list of Speedring Adapters for other strobes: Bowens and Godox, Broncolor, Comet, Hensel, Paul C Buff or Balcar, Elinchrom.
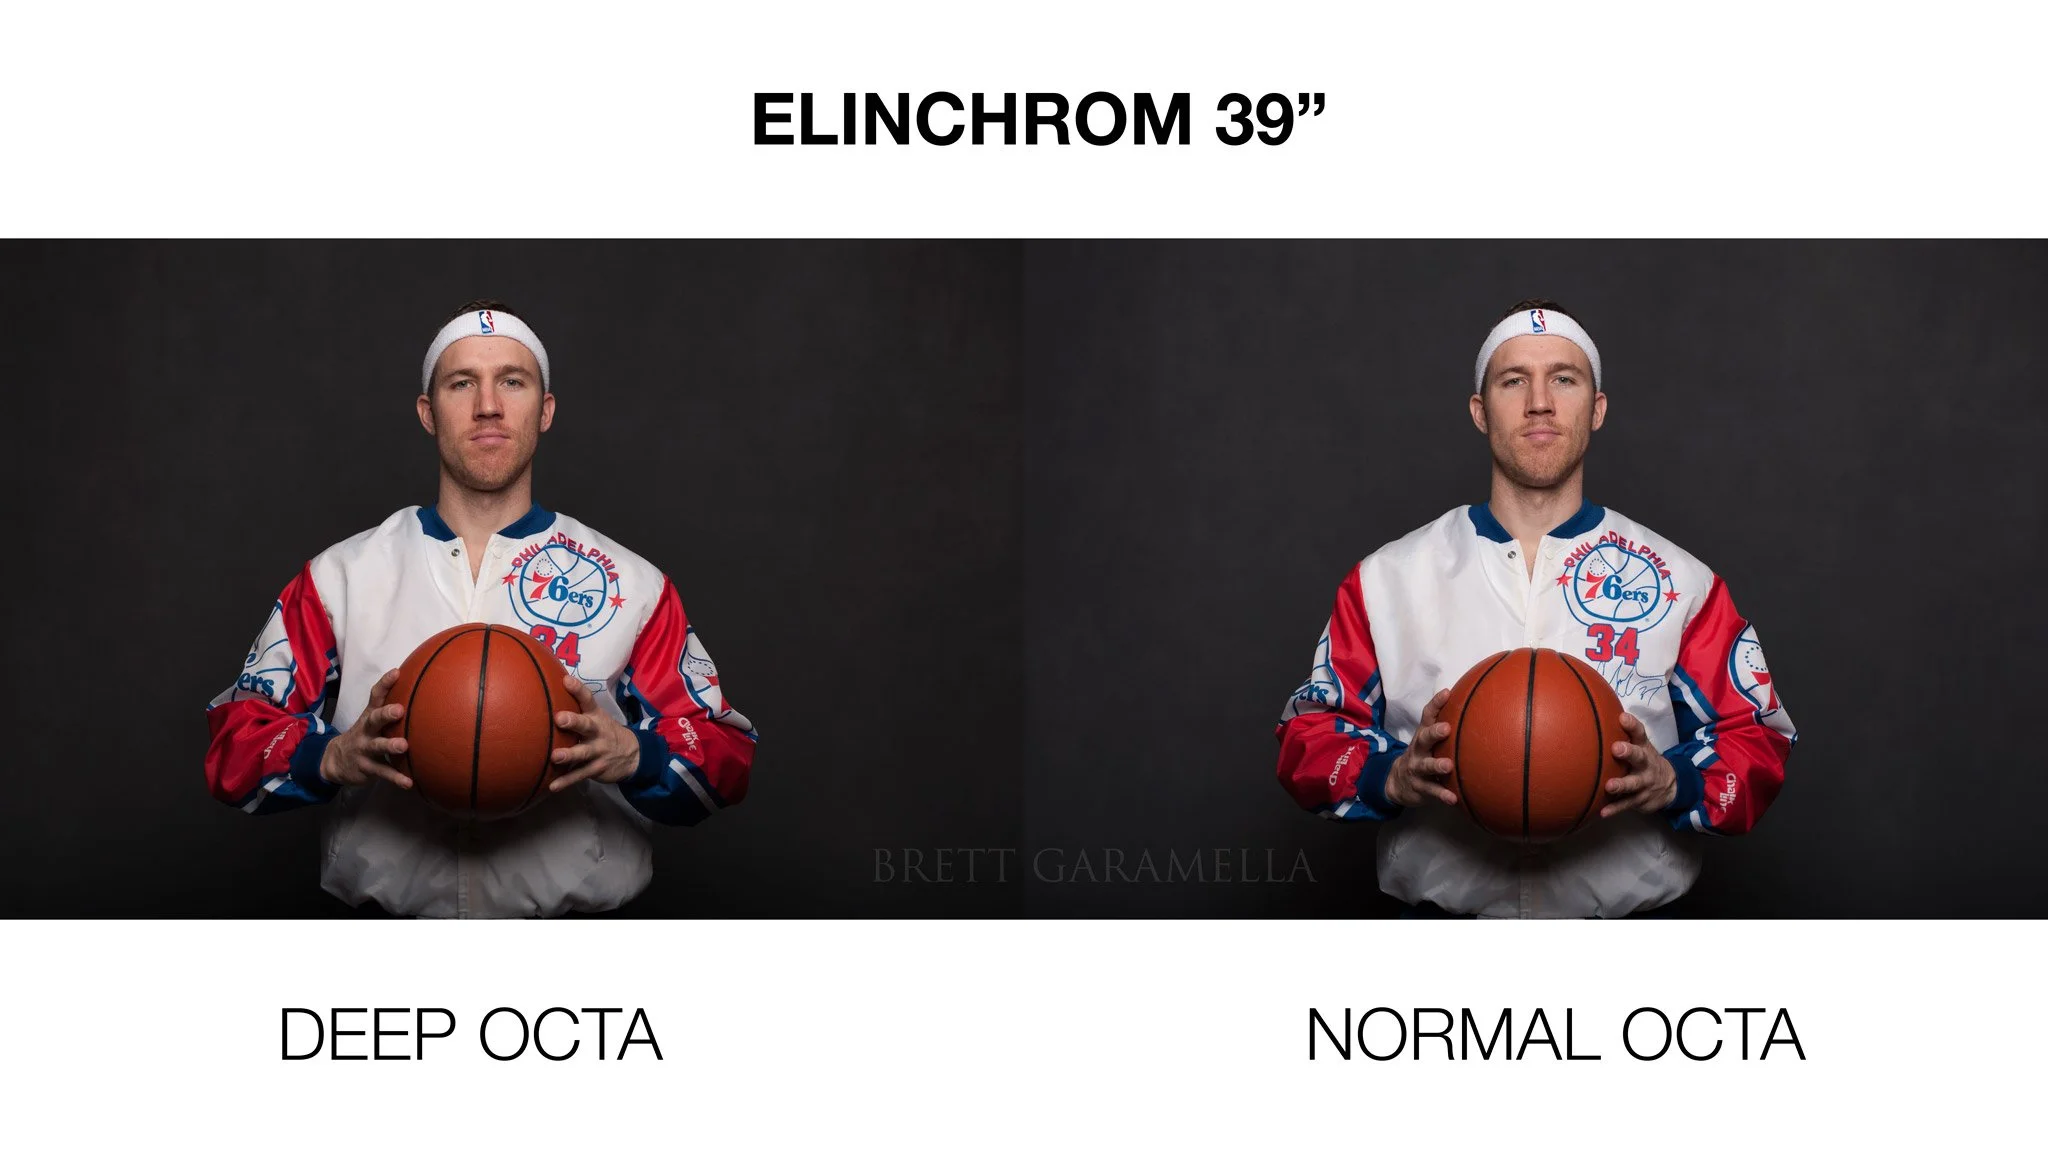
Shot 1: Deep vs Normal Octa at 45 degrees
I used three different lighting setups. For each lighting setup, I first shot with the Deep Octa and then with the Normal Octa. I have provided a lighting diagram for each setup. Note that I used a Deep Octa in each lighting diagram. I did not include a second diagram with the Normal Octa because it was placed in the same position, and I did not want to be repetitive. I used a medium gray backdrop (10’x12’) with a Linco background stands and support. I shot with a Nikon D810 and 50mm f/1.8 lens, using Profoto Connect Pro Remote to trigger a Profoto B10X Plus. The camera and lighting settings stayed the same for each shot.
Camera Settings: 50mm, ISO 100, f/8, 1/250
Lighting Settings: Manual at 7.0 (from 4.0 – 10.0 scale)

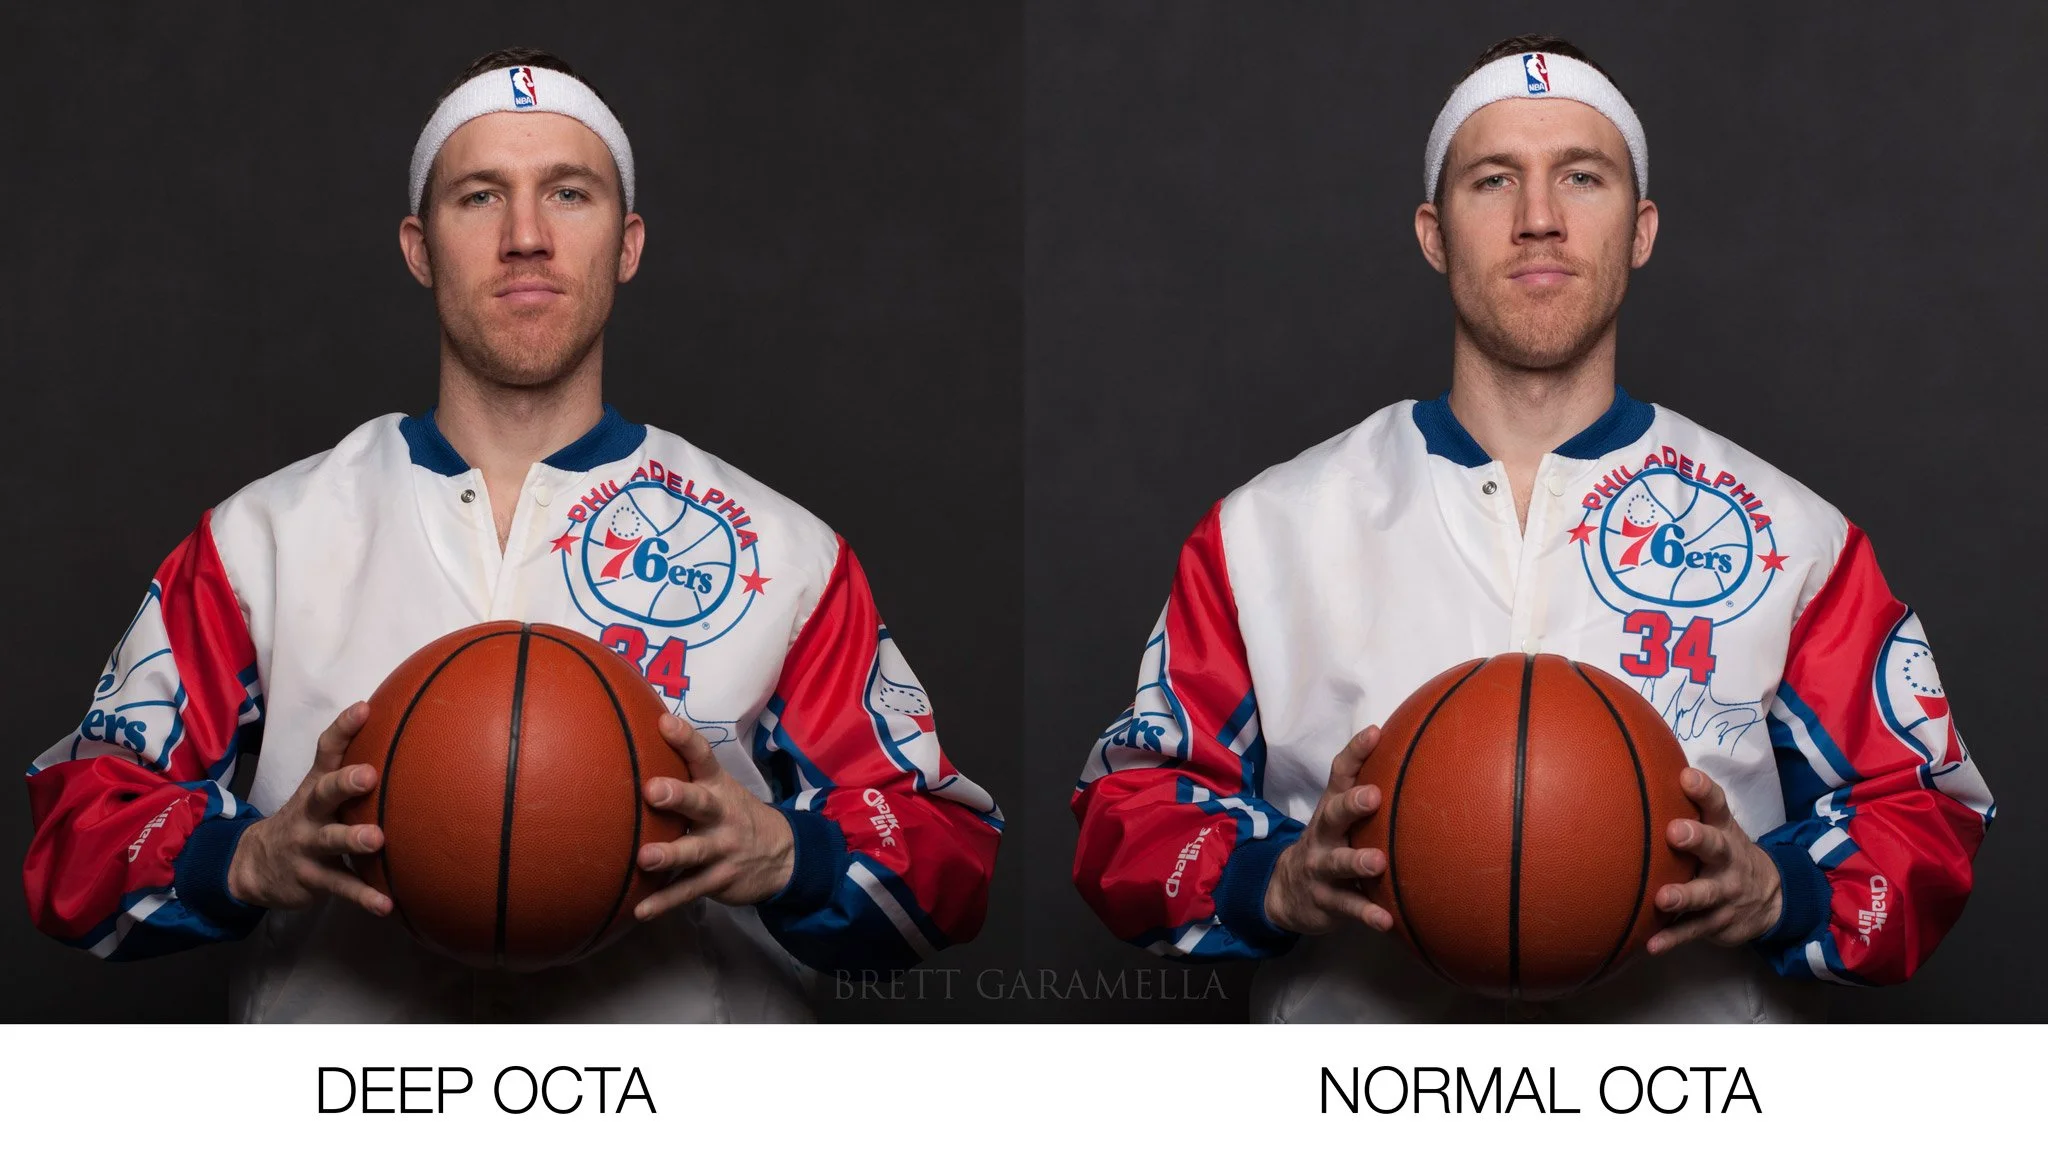
This first shot was classic Rembrandt lighting. The most important thing to keep in mind is how I feathered the light, or aimed it so the flash pointed 12-15 inches in front of my face. The smaller the octabox, the more this is important. By feathering the light, the center of the flash does not point directly at the person’s face because the light quality is too harsh. By having the side of the octa aimed toward the person’s face, you get much softer, flattering light. Below are the results from this first 45-degree shot side by side.

Looking at these images, you can see the difference in color. The Deep Octa is mucher warmer than the Normal Octa, giving the appearance of a different white balance. However, I used the same custom white balance of 5500 Kelvin for both shots. It is also worth noting how the Deep Octa isolates the light on me, where the Normal Octa has a much wider spread.

Looking close you can see the difference in spread of light. The Normal Octa had a much wider spread and wrap-around quality, causing lighter shadows on my face and in the background. The overall color temperature is warmer with the Deep Octa, which I believe makes it more flattering on someone with really white skin like myself. Perhaps someone with darker skin color would look better with the Normal Octa. Nevertheless, the Normal Octa would be better for beauty shots, where the Deep Octa seems more suited for refined, fine art photography.
Shot 2: Deep vs Normal Octa at 90 degrees
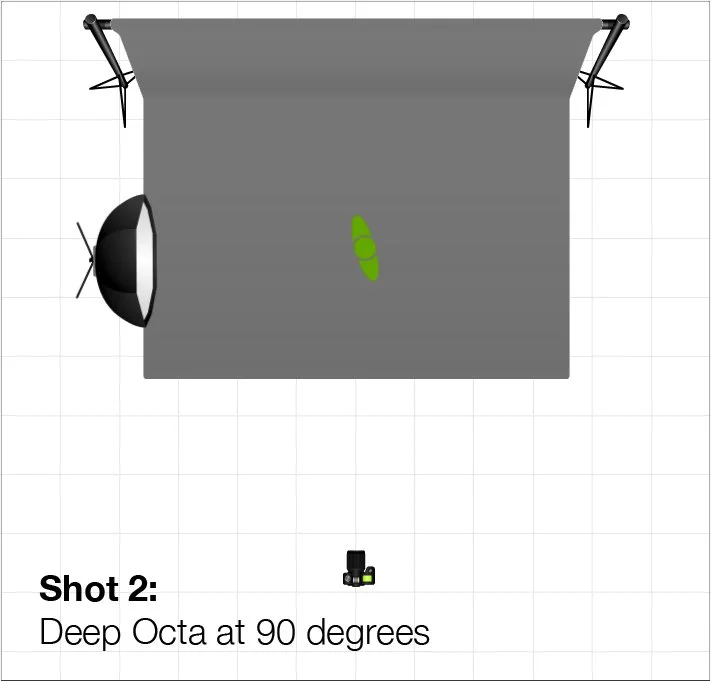
This second shot is one of my favorite lighting setups because I prefer dramatic lighting. I want a sense of mystery and mood in my photographs. So I positioned the octa to the side and turned my body and face toward it.

The Deep Octa is the clear winner in this photo comparison. The light falloff is much smaller, making the background much darker, thus creating a moodier image. I also like the warmer tone of the photograph with the Deep Octa.

Looking close, we can see that both photos have an excellent light quality. The warmer color tone and darker background are the two things that are most apparent with the Deep Octa. I could add warmth and a darker background to the Normal Octa photograph in Photoshop. However, this would be time-consuming. I would much rather get the photograph right in camera because it would save me time, be very difficult to change specific light quality in Photoshop, and impress clients if I’m shooting tethered to a monitor. My experience has taught me to get it right in camera, not in Photoshop. That is why using the Deep Octa to get this darker background shadow would be my choice for this photo.
Shot 3: Deep vs Normal Octa straight on
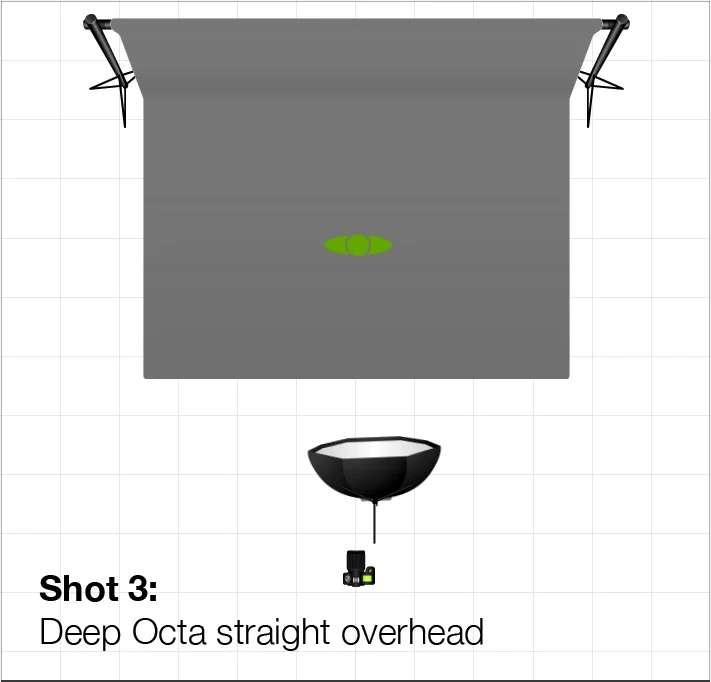
In this third and final shot, I wanted to aim the octa straight at the backdrop. I positioned the octa just right of the camera so it would not be in the shot. I also raised it just above my head, tilting it 20 degrees down.
This setup is different from the previous two because it is not side lighting. This straight on lighting leaves fewer shadows on my face. The only major difference is the warmer color tone with the Deep Octa. The background is darker with the Deep Octa as well, but if you adjusted the exposure - brightening the Deep Octa photo and darkening the Normal Octa - they would be quite similar.
The light quality is obviously very similar when you crop into the photo. The Normal Octa would be better for beauty photography, which often uses straight directional lighting. The shadows are almost the same, with the Deep Octa just slightly darker. The warmer color tone and dark background is again noticeable in this shot. In the previous shots, I liked the Deep Octa because it had a moody feel with its darker shadows. In this shot, however, the Normal Octa seems to be the better choice because it is a much flatter lighting style with a brighter mood.
Final Thoughts and Recommendations
The biggest takeaway from this shoot is that the shape of the modifier makes a significant difference in your lighting and the outcome of the photo. In fact, the shape of the modifier was the only variable in this shoot. I used the same camera and lighting settings for each shot. Even the material for each octabox was the same. The only difference was the shape of the lighting modifier - deep vs normal - which significantly affected the warmth, shadows, and quality of light.
I prefer the Elinchrom Deep Octa because it fits my personal style of photography. I like photographs with mystery and a thought-provoking mood. The Deep Octa delivers this with darker shadows and a narrow spread of light. I light most of my subjects from the side and 45 degrees, so I don’t want the light to go everywhere.
The Elinchrom Normal Octa provides a wide spread of light and is better suited for photographers who light a subject straight on or do beauty photography or shoot headshots. It also would be good for fashion photography because you are providing light on the entire garment.
Below are my recommendations for choosing an Elinchrom Deep or Normal Octa:
Reasons to Use Elinchrom Deep Octa
● Warmer color, better for people with whiter skin tones
● Better for dramatic and side lighting, providing darker shadows and more sudden, abrupt light falloff
Reasons to Use Elinchrom Normal Octa
● Easier to carry (22.5” carry case), smaller when open, so better in tight areas
● Great for beauty photography and tight headshots with direct lighting
● It is $59 cheaper than the Deep Octa
I hope you learned something from this lighting comparison, and it helps you choose the best octabox for your particular photography shoot. I would love to see what you’re shooting, so connect with me on Instagram: www.instagram.com/brett.garamella
~ Brett
Elinchrom 39” Normal Octa: Click Here
Elinchrom 39” Deep Octa: Click Here
All the gear I recommend: Click Here